Ceci est important. Veuillez faire traduire.
Diese Mitteilung ist wichtig. Bitte übersetzen lassen.
Este é un aviso importantante. Queira mandá-lo traduzir.
Este es un aviso importante. Sirvase mandario traducir.
Quest č un avviso importante. Tradurlo.
CAUTION
![]()
CAUTION
![]()
Your Nimble CROSSWINDTM requires an installed hub. You can install it yourself if you are familiar with bicycle maintenance and bicycle shop tools. If you are inexperienced or uncomfortable with your mechanical abilities, you should find an experienced shop mechanic to install your hub or any other accessories needed to get your wheels race ready.
TIP
![]()
Your Nimble CROSSWINDTM has an optimal orientation both for placing the hub in the composite wheelbody and for placing the wheel in a bicycle. This is because the integrated aerodynamic design of Nimble CROSSWINDTM performs best when the wheel rotates with the leading-edge of the spoke air foil facing forward when at the top of the wheel. This optimally orients the air foils to account for apparent wind and wheel rotation.
The hub installs from the right-hand side of a properly oriented wheelbody. This orientation places the teardrop airfoil shape at the spoke/rim intersection so that the “rounded” leading edge is forward in rotation while the “pointed” trailing edge faces backwards.
TIP
![]()
When placed at the top of the wheel, the tire valve is located behind the trailing edge of spoke number 1. Typically spoke one has the Nimble decal. When optimally orientated, the tire valve will hide behind the spoke as it rotates forward into the wind. Now confirm the right-hand side of the wheelbody for hub insertion and the left-hand side for lockring and quick-release lever arms.
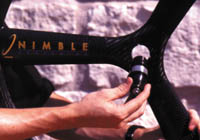 Carefully push the hub into the wheelbody.
Precisely align the hub in the center wheel body hole and carefully but firmly push the hub through the wheel body. This hole has been precision machined and should not require excessive force. If you are having trouble, make sure that the hub is straight, or try gently rocking the hub to straighten it. With a front hub, the slots in the wheel body hole are not used. With a rear hub, track hub, or any driving hub, (such as a front handcycle hub,) the slots in the wheelbody and the slots in the hub should be
 Secure the
lockring.
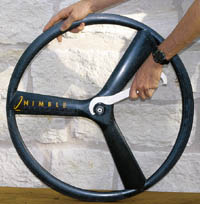
Secure the
lockring.Make sure the hub and lockring threads are clean. Spin the lockring onto hub threads on the left-hand side of the wheel and tighten to 40 ft. lbs. (54 N-m) of torque. To avoid injury, make sure the lockring tool is fully and securely seated in the lockring before applying pressure. The lockring secures in the clockwise direction. Using the correct level of tightening torque is the most reliable way to ensure the lockring stays in place. It is also fine to add a thread locking compound.
Using the correct lockring torque is critical to rider safety and wheel function.
A correctly installed hub and optimally oriented wheel will present the lockring on the left-hand or non-drive side. Remember: left-hand lockring, left-hand lockring, left-hand ...
The rim’s tire contact surface should be wiped clean before mounting a tire. Check the rim for damage burrs or cracks in the surface. Never hide damage under a mounted tire. Never ride a damaged wheel.
An improperly mounted tire can fail dramatically and cause serious injury. If you are unfamiliar with tire installation, inexperienced or uncertain of your abilities, you should seek help from an experienced bicycle mechanic or bicycle shop.
Follow the tire manufacturer’s recommendation for mounting a tire. The rim width of the Nimble CROSSWINDTM is 19 mm. This is suitable for tires 19 to 28 mm (3/4 to 1 1/8 inches) in width.
TIP
![]()
When bracing an exposed rim during tire mounting use a wood block, carpeting or shoe top rather than an abrasive pavement surface.
Your Nimble CROSSWINDTM uses tires or tubes with high pressure presta valves. A screw-on alloy valve extender is provided to lengthen this valve while inflating your tire. The locknut on the valve should be open before you install the extender and the extender well tightened. (See tubular tire advice)
CAUTION
![]()
When filling your tires, you should follow the tire manufacturer’s specific pressure recommendation for the tire you are using.
TIP
![]()
There are some tubes and tires available with longer valves that eliminate the need for valve extenders. Ask your local shop or call Nimble for available options. (See tubular tire advice)
 Install a
skewer.
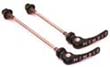
Install a
skewer. Your wheel requires a skewer to mount it to your bicycle. Front hubs mount in 100 mm forks, while rear hubs mount in 130 mm rear dropouts. If your bicycle does not accept these sizes contact Nimble for alternative options.
CAUTION
![]()
Check your skewers before every ride!
Do not use your wheel until you are thoroughly familiar with the operation of your quick-release or bolt-on skewer. Having your skewer securely closed is vital to your safety. You should read and understand all the instructions provided with it. You should check your skewer before every ride. If you are inexperienced or have any doubts about your ability either to secure or check your skewer, you should seek help from an experienced bicycle mechanic or bicycle shop.
TIP
![]()
Consistently placing the quick-release lever on the same side of your wheel will help you change wheels efficiently and will help you keep your wheels optimally oriented as well. Many racers make a practice of putting the lever on the left-hand (non-drive) side.
Install your wheel correctly oriented in your bicycle (as noted in Step 1) and carefully check your brakes. Be sure the brake pads are fresh and correctly aligned with the rim braking surface.
Check your brakes before every ride!
Having your brakes correctly aligned is vital to your safety. Having fresh brake pads and proper clearance around any brake pad tire guide or other accessory is also critical. You should check your brakes before every ride. Worn pads can suddenly fail and leave you unable to brake. If you are inexperienced or have any doubts about your ability to check or adjust your brakes, you should seek help from an experienced bicycle mechanic or bicycle shop.
The materials used in the braking surface of the Nimble CROSSWINDTM may be different from those you have experienced. You may travel at greater speed and require longer braking distances. Your safety warrants that you learn the distances required when using your braking system with your current or any new pad you install. This must be done prior to depending on any minimum braking distance, or previous experience of brake modulation. You should also learn and practice with the changes caused by wet weather, prolonged descending or other any other riding condition that may effect braking.
Do not apply direct loads or sharp objects to the surfaces of the hollow spoke sections. When packing and transporting your wheels, be careful that hard or sharp objects or focused loads are not placed directly on the side surfaces of the wheel. Storing in excessive heat or direct sunlight for extended periods shortens product life.
Do not drill into or cut into any part of your Nimble CROSSWINDTM. Do not paint the wheel or apply any unauthorized decal, or decal adhesive chemicals. Any such modification is hazardous and voids your warranty.
Standard wheels are for standard riders. Do not use this wheel on tandems or off-road bicycles. This wheel is for single rider road use only. Improper use is hazardous and will void all warranties. Any large or heavy rider should use the same caution as when riding a properly tensioned 28 wire spoke wheel. We do make Clydesdale and Tandem strength wheels contact us to configure for heavier riders. Also see our page on rider and wheel weight limits.
After any impact, drop or crash, you should immediately and carefully inspect your wheels. Riding without inspection is hazardous. Call Nimble for an inspection procedure or service support options if needed. Contact us to arrange a factory inspection at no charge for service (only shipping). Note that Nimble offers discounted crash replace prices on almost every item.
After any impact or crash, spin your wheel in a truing stand or in your bike. A bent wheel is structurally compromised and unsafe. Check your wheels for surface cracks. If you notice any cracking, creaking, or popping noises, do not ride your wheel. Contact Nimble to arrange a factory inspection at no charge for service (only shipping).
The hub in your Nimble CROSSWINDTM uses precision high-grade cartridge bearings. The specific makes and models are qualified by durability and precision. They typically have seals that ride in a labyrinth groove to improve weather proofing and reduce rolling friction.
Despite the excellent resistance to outside elements, no bearing is completely water-tight. You should avoid direct wetting and submersion of your hub bearings when washing your bicycle. If you ride in wet conditions, or notice moisture collected on your hubs, use a cloth to dry them. This will help protect the bearing lubrication. If a bearing should become hard to turn, rough or inconsistent, contact Nimble for service options.
To remove the hub from the wheel body loosen the hub lockring in a counter-clockwise direction until it spins off the hub threads. With the lockring removed, push the hub through the body. The hub goes out towards the right-hand side. Wipe away any dirt or moisture that may have accumulated on the hub or inside the wheel body. Handle your hub carefully. The hub has precision tolerances that can be ruined if it is dropped on a hard surface.
Do not bang on the axle ends to remove the hub. This ruins the bearings. If needed, apply lateral pressure with a hollow spacer placed in uniform contact around the edge of the hub shell.
Keeping your wheel clean not only makes it look faster, it actually improves its aerodynamic and mechanical performance. All you need is a cloth dampened with water and mild soap.
Avoid chemical cleaners or solvents. Some chemicals can harmfully react with wheel materials or components. Do not use polishes or abrasive cleaners. To be safe, use only factory supplied decals on your Nimble CROSSWINDTM.
Take extra precautions at night!
Your wheels come configured for daytime riding only. Night-time riding requires additional lighting and safety precautions. For night-time riding you should mount an appropriate lighting system and apply safety reflectors to improve your visibility.