| Tubular
Tire Advice |
We are happy to offer advice on tubular (sew-up)
tires. This page describes tubular tire preparation,
mounting and maintenance. Read on to improve your skills and compare
experience.
If you want more personal help,
please call or contact us.
We mount a lot tubular tires, we can help. We also appreciate your feedback, tell us how
to make these instructions clear and complete.
Nothing beats hands on training with a skilled expert.
We
give free tire mounting lessons at the race events we attend. If you
see us at an event do come and say hello!
|
|
Although we prefer to mount 98%
of our tubular tires with glue, we also
carry Tufo tubular tire tape.
Tape is an alternative that is very
secure, and offers easier first mounting. It has a 20
gram weight penalty and be warned it can be trouble to remove in race changes, and more messy
than glue in second mountings. We will recommend tape in a supported
race venue (a mechanic is doing the tire changes while the rider is back
in the race) that requires quick set-up (doesn't have time for glue to dry
at least 4 hours).
Warning! Please make sure you are comfortable with and aware of your
skill limits in both tire mounting and bike handling. Please test your
limits before you commit yourself to a sharp high-speed turn. For safety, always
check your tires before you ride. Do this by trying to push your
tires off the rim with your thumbs -- they should feel secure!
We sell tires. To order,
check out our Race
Ready ProgramTM and contact us.
|
Why
Ride Tubulars?
|
Improved performance drives the five most common reasons we recommend tubular tires.
|
|
Feel |
1) Better handling/feel.
A tire's feel is driven by its materials and the shape of its contact patch
(the part that hugs the ground). A tubular tire puts the whole air
volume between the rim and the ground. This provides the best shape
for conforming to the ground. "Feel" is the reason cited most by pro
road racers who push limits of their bike handling. The ride is more
comfortable, turns are less slippery. For feel, the materials in both
tubular and clincher tire types
are often excellent, but the best materials (highest thread count,
greatest strength/weight) are available in high-end tubulars.
|
|
Strength |
2) Tougher tires. The vital weight
of tubular tires is in the tread
where it helps with puncture resistance and durability. Clinchers
have a vital weight penalty in the bead hoop that holds the
tire to the wheel. Saving weight in a clincher design often means a thinner
tread.
|
|
Weight |
3) Lighter wheel rim weights. Not only are
tubular tires lighter than clinchers, but the rims of a tubular wheels are also lighter.
This is because they do not need to hold tire pressure across an open pressure vessel
structure. A tubular tire's pressure is self-contained. This weight difference is typically 60 to 120
grams in the most vital portion of the wheel. This weight difference
can dramatically effect wheel inertia and acceleration.
|
Aero
Drag |
4) Lower frontal area. Better handling feel
and handling often equates to narrower tires with equivalent or better
comfort and road adhesion. Narrower tires translate into lower wheel frontal area
and better aerodynamics (roughly proportional to the tire width).
This can be 15 to 25% better than clinchers. Narrower tires also
translate into additional weight and inertia savings.
|
Change
Time |
5) Faster race changes. While many new
comers fear tire changes with tubular tires, experienced hands will confirm they
are actually faster (change in less than a minute) and no more difficult
to learn than clincher tire changes. Read below to get tips on reducing tire
changing hassle. Fear not, you too can be a skilled tubular tire changer.
|
| Common Complaints |
The most commonly cited weaknesses of tubulars are
cost and hassle.
|
|
Expense |
1) More expensive flats. It is true, a flat
on a tubular is no longer commonly repaired. Versus changing an
inner tube, this is more costly. In evaluating this expense,
consider that tubular tires
are race tires and account for the expense of race day flats, which
most amateurs find to be fairly infrequent.
|
|
Learning |
2) Another thing to learn! Hassling with
tire gluing and changing flats is just another new thing to learn!
True. We argue that these skills are no more
difficult than the skills learned to change clincher tires.
Give yourself 4 or 5 tires to get messy with, and get some experienced
advice while you learn, and you will be an old hand in no time.
|
Contact
Us |
If you are new to tubular tires and want more advice on them, contact us,
we are happy to help first-timers. We also ship wheels race ready
with tubular tires mounted.
|
|
|
Benefits | Prep new tire |
Prep old tire | Remove tire |
Clean |
| Prep
a New Wheel |
Clean your wheel. With a new wheel,
it is a good idea to clean the tire bed as preparation before putting glue
on it. We use ethanol alcohol
and a cotton wipe. Isopropyl (rubbing) alcohol works also.
This will improve both the bonding of the new tire mount, and later tire removal from the wheel.
Please check that lubricants or other fluid materials have not been left
on your wheel rim. Although these are removed prior to
packaging, they sometimes
reappear in shipping from residue left in the interior of the wheel.
Assemble your wheel. If your
wheel is a CROSSWIND and is not assembled, it makes sense to assemble it before mounting your
tire. An assembled wheel can be
put in a truing stand or other wheel mount to hold your wheel while
working with it.
|
| Replace a Tire |
Unlike unused new clean wheels, once
a rim has been glued, you usually do
not clean your wheel. You need to clean the wheel tire
mounting surface only if you run into one of the following
circumstances: 1) the rim, tire or glue joint has become contaminated with dirt or
grease; 2) the rim's tire bed is very lumpy
and scraping doesn't help; 3) the glue used previously is not the
correct type of glue; 4) the glue used previously is old and
brittle; 5) the glue used previously is not sticking
well to the tire bed. If you need to clean see cleaning old glue below.
If you are unsure about this last choice, be conservative, and ask an
experienced source for advice.
|
|
|
|
Benefits |
Prep new wheel | Prep old
tire | Remove tire | Clean |
| Prep
a New Tire -- |
Preparation is everything!.
|
| The Valve
|
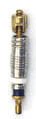
Prepare the valve. The valve is the
#1 reason a tire fails; it is worth being neurotic about prepping it
properly. We use 3 steps to prep a presta valve with a valve
extender (which many of our wheels use). If you do not need an extender,
skip step 3.
|
|
|
Valve step 1: Seat the
valve core
into the valve stem. This will stop the valve from leaking
because it is not fully assembled. The valve stem is usually brass and is the
outside piece. The valve core is usually silver and the inside
piece. Hold the two flat faces of the valve core with a needle nose
pliers and give a clockwise 1/8 turn. Be careful not to overpower
the turn and break the small parts.
|
|
|
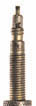
Valve step 2: Open the valve nut.
With a high pressure presta style valve, the
tiny valve nut must be open to get air into the tire. We open
it all the way to the top and add a little torque with a pair of pliers to keep it
from working its way closed on its own once it is installed. Be careful not to overpower the
turn and break the small parts. If you can not get air into a valve
extender, the most common reason is a closed valve.
|
|

|
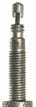
Valve step 3: Mount the valve
extender.
Screw on the valve extender supplied by us. Put it on all the way as
tightly as possible be hand, then add a little torque (about 1/4 of a
turn) by pliers. This will seat the aluminum extender against the
brass stem and improve the connection between your pump and your valve.
|
Stretch
it! |
Stretch the tire. New tires can be tight and hard to mount. It is good to give them a stretch.
You can do this by stepping through the tire and trapping one end on the
floor with your heel and then pulling on the other end with your arms (or
your thigh or hip if you want to save some energy.) If you are very strong,
be careful not to rip the base tape of the tire. Most normal
strength people can not pull hard enough to damage a tire. The goal
of pulling on your tire is to get it loose enough to be able to mount it
dry on a spare wheel. Most people can do this without stretching it,
but it is harder!. Leave your tire inflated at least over night (1
hour is better than nothing, 2 days is as good as forever) it will help
you! (Nimble pre-stretches and pre-inflates tubular tires for you
before shipping.)
|
Glue Base
Tape |
Add glue to the tire base tape.
Adding a layer of glue to the tape of the tire helps its bound to the
wheel. If you let it set up (dry for 1+ hours), it
will have a stronger bond and a wheel/tire mount that dries faster (2 to
24 hours depending on the glue). Letting the tire set-up, however,
makes it stickier and harder to mount the tire on the wheel. If you
have time to let the final assembled wheel/tire set, we would recommend
leaving yourself some working time by working with the tire while the glue
on it is still a bit wet. Inflate the tire to make it easier
to handle before you apply glue. If you work with wet glue, you will
need more final assembled dry time to ensure a strong result.
|
|
|
|
Benefits |
Prep new wheel | Prep new
tire | Remove tire | Clean |
Prep
a Used Tire --
The Valve
|
Prepping a used tire follows the same sequence as a new
tire:
Prepare the valve. Follow the
same three steps described in detail above in
prepping a new tire section: 1) Seat the valve core, 2)
Open
the valve nut, and 3) Mount the valve extender.
|
Stretch
it! |
Stretch the tire. No need to stretch
your tire, since it is already used, it should be the right size and easy to work with. This is one of
the best reasons why a used tire makes a great race day spare.
|
Glue
Base
Tape |
Add glue to the tire base tape. No
need to add much glue to most used tires. Do confirm that it has a
base glue layer and clean bonding surface. Add a
thin layer of glue just before mounting the tire. This glue helps
complete the bond joint. By timing this to right before mounting you can
maximize your mount working time. If you work with wet glue, you need
to leave more final assembled dry time to ensure a strong result.
|
| Mount
a tire on a Wheel |
Here are two steps to mounting: prepping the wheel and
mounting the tire.
|
|
Prep |
Prepare the wheel.
Add a layer of
glue to the wheel. We mount the wheel in a truing stand so that we have
both hands available to put the glue on. Use the corner of a small plastic
bag to cover your working finger. With one hand lay down a bead of
glue, with the other, use your working finger to put a uniform complete
layer across the rim tire seat. Have a scrap piece of cardboard
available to wipe off any excess. Add glue, spread, wipe off
excess, etc. Complete the whole wheel before mounting your tire. The
glue should be about 0.010 inches thick, about a thumb nail, or 3 sheets
of copy paper. Don't worry about wiping off glue that got away from
you on the side of the wheel. It will be easier to clean this once
it sets up; in about 1 hour it will get less gooey. But, if you leave excess
glue on longer than an hour it gets harder to work with.
|
| Mount |
Mount the tire.
Put a cardboard
scrap on the floor. Put the wheel on the cardboard with the
valve
hole at the top, mount the tire by carefully putting the tire valve
into the valve hole and
stretching the tire along the rim toward the
floor. Use the floor to backstop and hold the wheel
while you
stretch the tire downward.
Maintain tension on the tire as you
mount. You will need to stretch the whole tire on the wheel to make
it fit. Get the tire on straight as you mount it. While still
maintaining a good hold on both sides of the tire, lift the wheel off
the floor to get the
last 6 to 12 inches of tire mounted. Don't let go of your
tire -- keep the pressure on!
Once mounted, check the
base tape of the tire on
both sides of the mounted rim. If the tire is straight, there should be an even amount of
tire base tape showing all around the tire. You should try to lift and move the tire if
you need to straighten it. Work quickly before it sets up. The
sooner you straighten your work, the easier it will be.
|
|
|
Benefits | Prep new
wheel | Prep new tire | Prep
old tire | Clean |
| Removing
a Tire |
Learn some tricks to help dismount your tires.
|
| Holds
Air |
If your tire holds air. Keep about 60
PSI air pressure in your tire. It will help! Work opposite the valve
extender. Push both sides of one spot on the tire with your thumbs.
Once you get it loose and over the edge of the rim, use the loose portion
to peel the remaining tire. If you are having trouble, you may need
to deflate the tire and try the trouble instructions below. When
peeling the tire be mindful to pull up from the rim in the direction
of the rim -- this will help keep the tire base tape intact. If your
base tape gets detached from your tire it must be reattached with a proper
base tape adhesive before you can properly mount your tire again.
|
| Flat
Tire |
If your tire is flat. Work opposite
the valve extender. Push/pull both sides of one spot on the tire
with your thumbs. Once you get it loose and over the edge of the rim,
use the loose portion to peel the remaining tire.
|
Careful
Peeling! |
When peeling the tire be mindful to pull
the tire up from the rim in the direction of the rim and try to avoid
pulling it away sideways from the rim. This will help keep the tire
base tape intact since the base tape is strongest in the direction of the
tire hoop. If your base tape does get detached from your tire it will
be unsafe to ride and must be reattached with the proper special base tape
adhesive before you can mount your tire again.
|
Can't get
it Loose? |
Having trouble getting it loose!
Working opposite the valve extender -- very carefully and slowly, insert a
flat bladed screw driver blade between the tire and the rim. Gently
work the blade into the crevice by twisting the screw driver back and
forth. Work the screwdriver all the way through the joint between the
tire and rim. Do not force this and harm the rim or the tire, use
care, attention and persistence. Once the screwdriver is in place,
you can grip the handle and roll it along the rim with great leverage.
This will separate the glue joint. Once you have 6 to 12 inches of
tire loose, you should be able to push the tire off the rim and thereby
relieve the tire tension around the rim and then peel the tire.
|
|
|
Benefits | Prep new
wheel | Prep new tire | Prep
old tire | Remove tire |
| How
to Clean Old Glue |
Cleaning old glue off your wheel
Sometimes you have to clean your wheel. Just like glasses and
microscopes, the best way to clean your wheels is just to keep them clean! But if your wheel is a mess, or you have bad or
old or cracked glue or the mounting surface is dirty or muddy where your
tire should mount you will need to clean your wheel. The best
solvents to clean your wheel are powerful, dangerous and harmful to
people. Use these solvents only in extremely well ventilated areas
like outside. Protect yourself with a properly rated organic
chemical capable respirator, wear solvent proof gloves, eye protection and
proper body coverage. We use high volume ventilation, personal VOC
rated respirators, shop aprons, shop glasses and nitril gloves. We use
paint thinner or Xylene. In small quantities this solvent will not
harm your composite wheelbody or rim. It will damage the decoration and the lubrication of
mechanical parts. Keep any solvent away from your decals and your
hubs.
|
| Respect
Solvents and Oils! |
Remount a
tire only when your wheel is completely dry and clean. If
you mount a tire on a wheel that is still wet with solvent the glue joint will not be
secure. Some bike shops use WD40 as a thinner for removing tire
glue. WD40 leaves a lubricant behind that must be cleaned
completely to have a safe mounting surface. If we suspect that a cleaned wheel has a lubricant (like WD40) or a silicone cleaner, we make
sure to remove this lubricant from the tire mounting surface with alcohol
or a stronger non-contaminating (fast evaporating) solvent like acetone if needed.
Please note, acetone is only effective on oils, grease and muck, it is not
an effective solvent for removing tubular tire glue.
|
| Always
Check Your Ride! |
Always test your tires before
each ride by trying to
push them off the rim with your thumbs.
|